
🧃
You swing with real intent — the ball is gone by frame 12 and you finish tall, balanced and held for several frames, which is genuine athletic quality most recreational golfers never show. The problem is where the power comes from. At address you stand too tall for a driver: the forward bend is shallow (roughly 20 degrees at frame 4) and the handle sits high, so the club has to work up rather than around. That posture shows up at the top of frame 10, where the shaft is almost vertical over your head and the hands are lifted rather than deep behind the trail shoulder — that is an arm swing sitting on top of a modest hip turn, not a coil. From that steep, lifted top the only route down is a steep one, and frames 11-12 show the hips still fairly square with the chest crowding down at the ball. You get away with it because you are strong and fast, but you are spending arm speed to make up for a pivot that never fully loaded. Fix the address bend and the depth of the trail hip, and the shaft will find a rounder plane on its own.
Swing video
What’s working
Commitment through the ball: the downswing covers only about two frames (10 to 12) against five going back, so the strike is accelerating, not steered — that speed is a real asset to build on.
The finish at frames 19-22 is complete and genuinely held: chest to the target, trail foot up on the toe, and no stumble or extra step for several sampled frames.
Head and spine stay quite centered from address to the top — there is no sway off the ball in frames 6 through 10, which is a solid foundation to add depth to.
Highest priorities
- 1
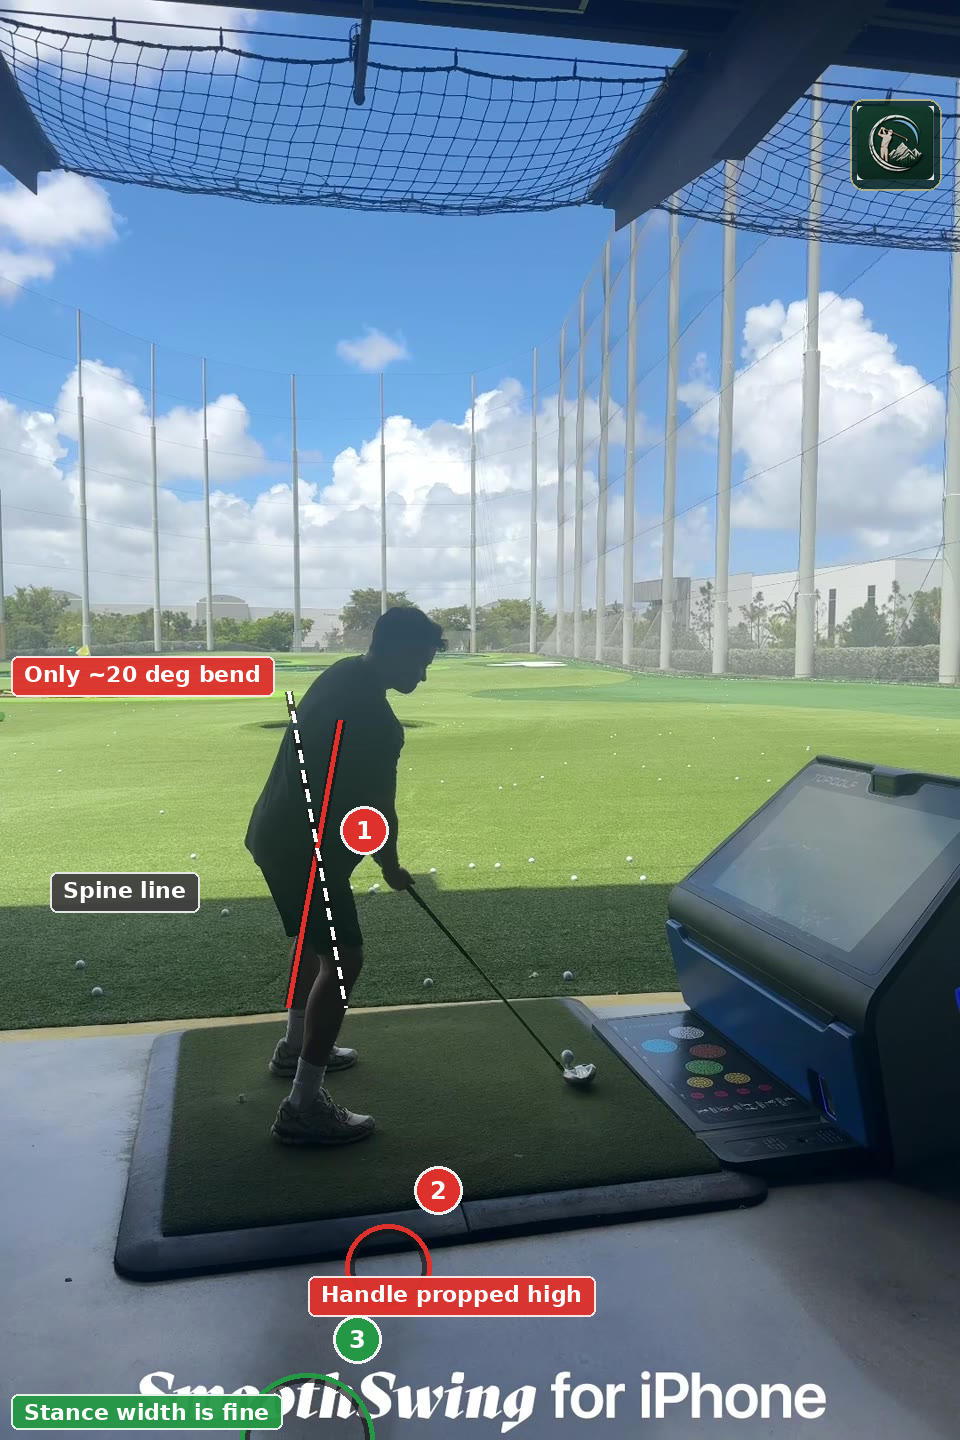
Add forward bend from the hips at address. You stand roughly 20 degrees over at frame 4 with the handle propped high; a driver needs closer to 30 degrees with the arms hanging under the shoulders, or the club is forced to lift instead of turn.
- 2
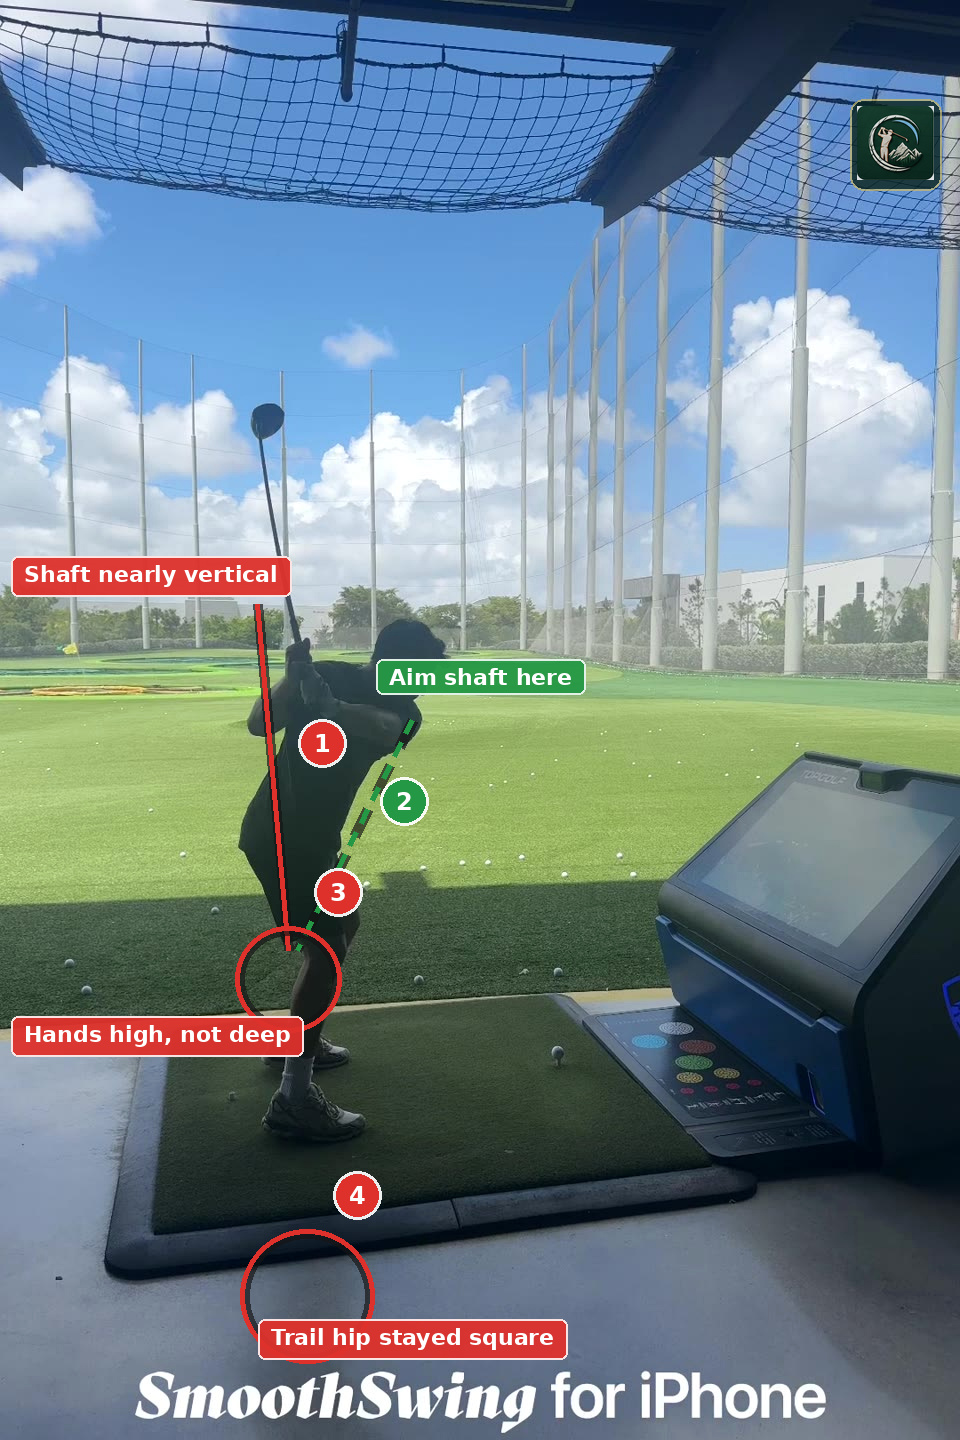
Turn the trail hip behind you instead of lifting the arms. At the top (frame 10) the shaft is near vertical and the hands are high rather than deep — that is arm height standing in for body coil, and it forces a steep delivery.
- 3
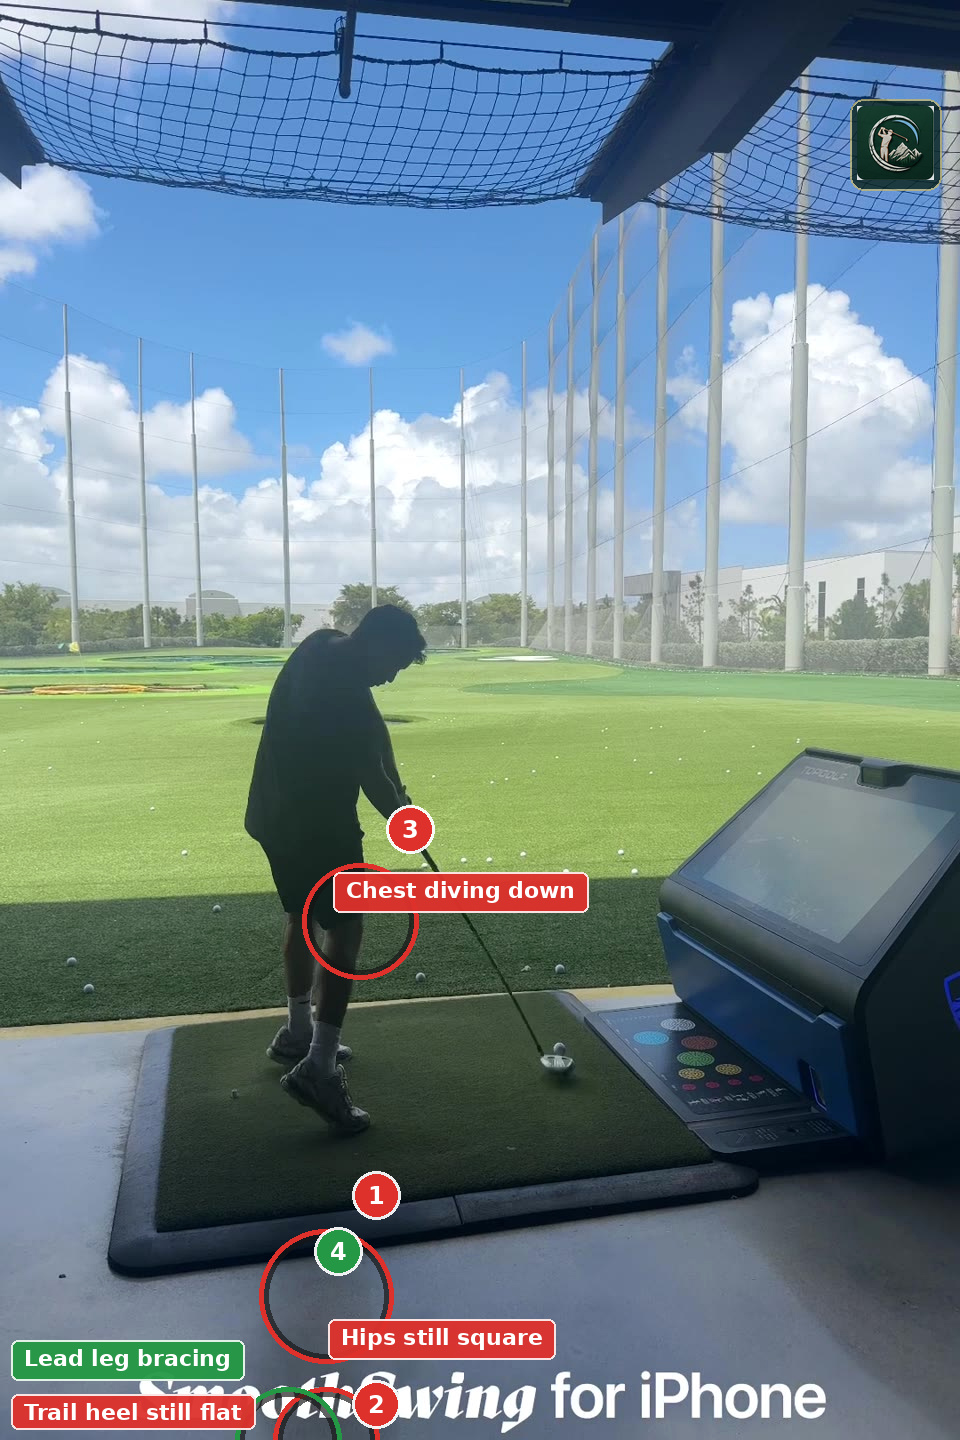
Get the pelvis leading and open at the strike. Frames 11-12 show the hips still close to square with the arms delivering everything; the body must be turning through, not waiting for the hands.
Four positions that shape the swing.
Annotations point only to features visible in the selected frames.
 01
Address / setup
- 1only ~20 deg bend
Your spine from hips to shoulders at frame 4 is far too upright for a driver — closer to 20 degrees of forward bend when 30 is the target. Standing this tall forces the arms to lift the club rather than swing it around the body.
- 2handle propped high
The hands sit high and close to the thighs instead of hanging freely beneath the shoulders, a direct consequence of the shallow hip bend. Let the handle drop until you can see daylight between hands and legs.
- 3stance width is fine
Feet are set at roughly shoulder width for the driver with athletic knee flex — this part of the setup does not need changing.
 02
Top of backswing
- 1shaft nearly vertical
At the top the shaft stands almost straight up rather than lying halfway between vertical and flat — this is the clearest fault in the swing and it is pure arm lift. A rounder shaft here would let the club shallow by itself in transition.
- 2aim shaft here
Target plane: the shaft should lean back over the trail shoulder toward the target line, roughly halfway to horizontal, with the hands deeper behind the chest.
- 3hands high, not deep
The hands finish above the head instead of behind the trail shoulder, so you have height but no width or depth to trade for speed on the way down.
- 4trail hip stayed square
The belt line has barely rotated behind you — the arms made the backswing while the pelvis stayed put. Turning this hip back and behind you is where the missing coil lives.
 03
Impact
- 1hips still square
At the strike the pelvis has hardly opened to the target, so the arms are delivering all the speed. The hips should be clearly turned open with the chest chasing them.
- 2trail heel still flat
The trail foot is still planted flat as the club reaches the ball — rotation is not pulling it up, which means the ground is not contributing to the strike.
- 3chest diving down
Compare the head and chest height here with frame 4 — the upper body has crowded down and toward the ball instead of holding its tilt behind it. That steepens the strike further.
- 4lead leg bracing
Weight has moved onto the lead side and the lead leg is posting up — this part is working and is worth protecting as you add hip rotation.
 04
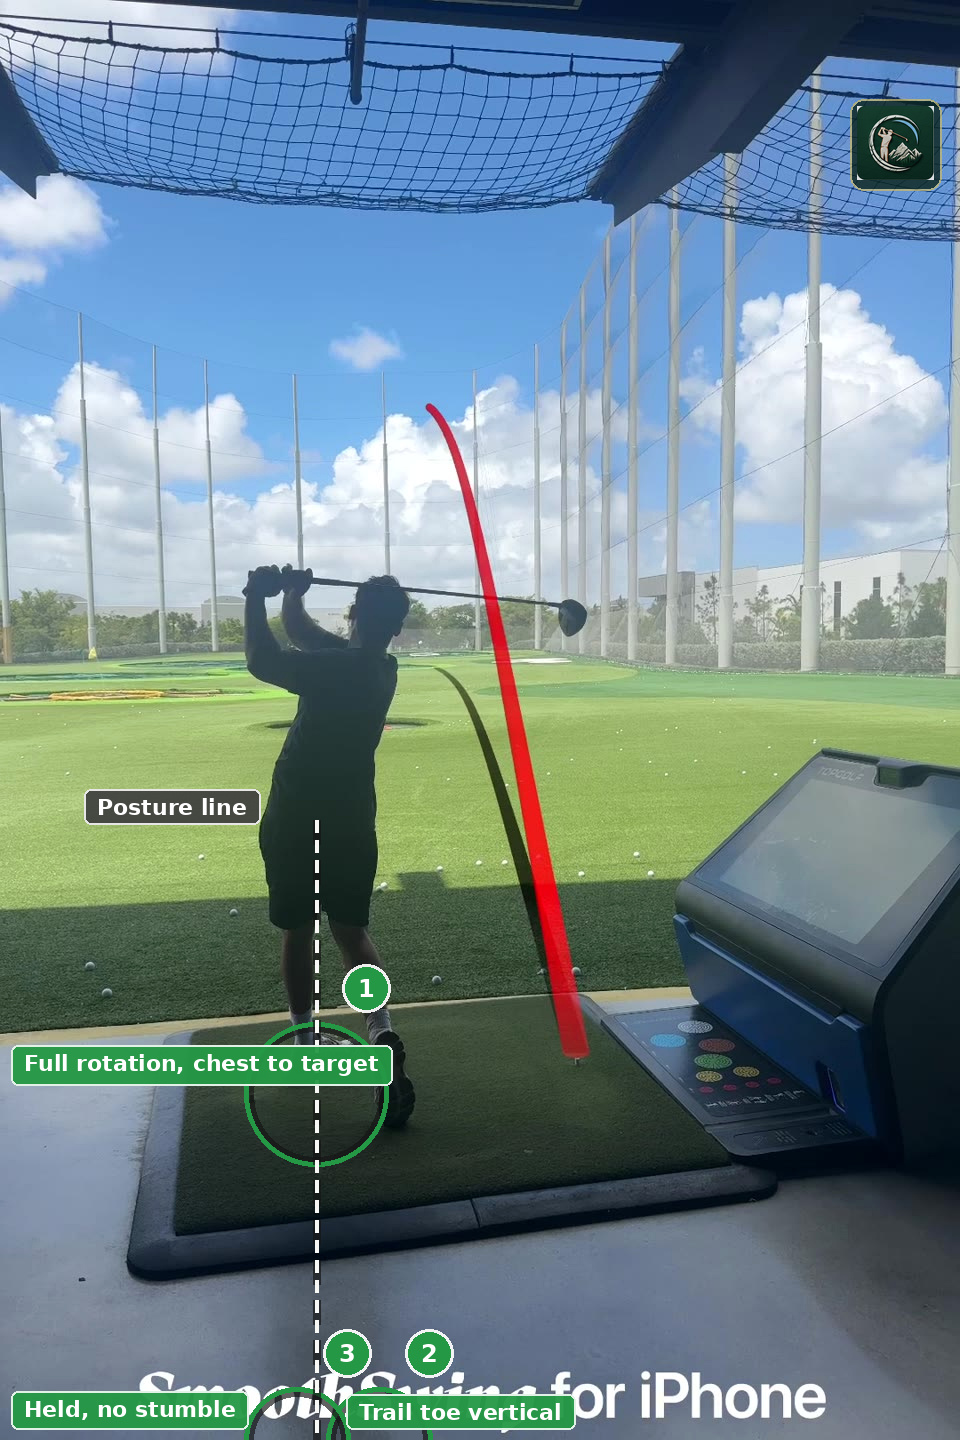
Finish
- 1full rotation, chest to target
Hips are fully cleared and the chest faces the target — the finish is exactly what you want and shows the rotation is available to you. The task is producing it before impact, not after.
- 2trail toe vertical
The trail foot has released cleanly onto a vertical toe with all the weight on the lead leg — tour-standard weight transfer at the end of the swing.
- 3held, no stumble
The position is stable across frames 19 to 22 with no recovery step, which tells me your balance is not the limiting factor — sequencing is.
The complete read.
Each checkpoint is scored from one to five based on visible swing positions.
Setup
9 / 15At frame 4 your forward bend is only about 20 degrees from the hips — you are standing tall with the chest behind the toes rather than over them, and the handle is propped up rather than hanging. Stance width is reasonable for a driver and the knees carry some flex, but the tall posture and high hands are the root cause of the vertical shaft at the top. Bend more from the hip joints and let the arms hang until you feel the handle drop.
Feet, knees and hips read as one coherent line from behind, and the setup is genuinely still — frames 0 through 5 show no fidgeting or drifting, which is worth keeping. Shoulder line cannot be judged reliably from this backlit down-the-line angle. Ball position looks a touch back of the lead heel for driver and there is very little spine tilt away from the target, which pushes you toward a steeper, more descending strike with the big stick.
The silhouette hides grip detail entirely, so hand placement and face squareness cannot be graded. What is visible is that the hands sit high and close to the body at frame 4 rather than hanging under the chin with space — a direct product of the shallow forward bend. The arms look calm and unhurried at address, no visible squeezing or regripping.
Backswing
7 / 15Frames 6 and 7 show the club, hands and chest moving away roughly together — no snatchy hands-first pickup, though the chest could carry more of it. The lower body is genuinely quiet and braced with no sway off the ball, which is the best part of your backswing. Clubhead position relative to the hands is obscured by the backlight; the wrist set looks progressive but arrives a little early as the arms start to lift.
By frame 10 the shoulders have turned, but nothing near the 80-90 degrees a full driver swing wants, and the trail hip has barely gained any depth — the belt line is still close to where it started. Head and spine stay admirably centered, no dip or slide. The arms have clearly outrun the body: they are lifted up rather than swung around, so you arrive at the top with height instead of coil, and height cannot generate ground force.
The shaft at frame 10 is essentially vertical, pointing straight up above the trail shoulder — that is not a plane at all, it is an arm lift, and it is the single clearest fault on the card. The hands are high but shallow, sitting over the head rather than deep behind the chest, so you have no width to trade for speed. Lead arm structure holds acceptably, but the position looks braced rather than loaded, which forces the downswing to start with the arms.
Downswing
5 / 10Pressure into the lead foot cannot be read from this silhouette on a mat. What is visible between frames 10 and 11 is that the upper body moves first — the shoulders and arms drop the club down the same steep line it went up, with no shallowing move in transition. Posture and head height hold reasonably well through the change of direction, which keeps this from being worse, but from a vertical shaft the only available path is over the top.
At frame 11 the hips have not clearly outraced the chest — the pelvis and torso are arriving close to together, which means the arms are the engine. The trail heel is still essentially flat on the mat as the club reaches the ball, a clear sign the ground is not being used. Wrist angle into the delivery zone looks reasonably retained and rotation does keep flowing rather than stalling, so the raw speed is real — it is just being produced by the wrong parts.
Impact & Finish
7 / 10The hips at frame 11 are barely open to the target while the ball is being struck, so the arms have to deliver everything — that is the ceiling on your distance and your consistency. Weight has moved to the lead side and the lead leg is bracing, which is functional. The chest crowds down and forward toward the ball rather than the head staying back with the address tilt retained; you can see the upper body dive slightly between frames 10 and 11. Shaft-versus-hands relationship at the strike is h
This is your best segment. By frame 20 the chest and belt buckle face the target with the hips fully cleared, the weight is entirely on the lead leg, and the trail foot is up on a vertical toe. The position is held still through frames 19 to 22 with no stumble or recovery step — genuinely tour-standard balance. The only reservation is that the overall motion still looks like arms racing a slow body rather than one sequenced chain, so the finish is better than the swing that produced it.
Three drills.
One direction.
Build the motion slowly, then add speed only when it stays organized.
Rebuild the address forward bend from the hips so the arms can hang and the club can swing around rather than up.
Wall-Bend Posture Set
- Stand with your heels about a foot from a wall and push your backside back until it touches, feeling the bend come from the hip crease, not the waist.
- Let the arms drop straight down until the handle hangs low and you can see space between your hands and your thighs.
- Hold that bend, take the club, and check in a phone mirror that your chest is over your toe line — roughly 30 degrees of tilt.
- Hit ten half-speed drivers from this posture before adding any speed.
Replace the arm lift at the top with real trail-hip depth and a rounder shaft plane.
Trail-Hip Depth Turn
- Set up with a club or alignment stick against your trail hip pointing back away from the target line.
- Make a slow backswing and turn your trail hip so it moves behind you and touches the stick, keeping the head still.
- Let the arms follow the turn only as far as the hip depth allows — stop when the shaft feels like it is leaning across your shoulders, not standing up.
- Repeat ten reps, then hit five balls trying to reproduce the same top position at full speed.
Get the pelvis leading the downswing so the hips are open at impact instead of square.
Trail-Heel Release Step
- Take your normal driver setup, then lift your trail heel slightly off the ground before you start back.
- Swing to the top and start down by pressing the lead foot into the ground and letting the trail heel spin up off the mat.
- Feel the belt buckle facing left of the target while the chest is still catching up as the club reaches the ball.
- Do five rehearsals, then hit three balls, and check on video that the trail heel is clearly off the ground at the strike.