
Fred Couples
This is a well-organized, athletic driver swing from a player who clearly knows what he's doing: the setup is tour-grade, the takeaway is genuinely one-piece, and the finish at frames 10-14 is a full, balanced, held photo-finish with the trail foot released onto the toe. The engine of the swing is a good pivot into a deep, loaded top at frames 4-5 with a shaft that sits on plane, not lifted. Where it leaks is the top and delivery: the lead arm softens slightly and the hands sit a touch low and behind at the top (frame 5), and in transition the upper body joins the party earlier than ideal — at frame 6 the shoulders have already unwound a long way while the hips have only just started, so the sequence is compressed rather than staged. The strike at frame 7 is delivered with the head behind the ball and the lead side bracing, which is the reason the ball still gets hit hard, but you are spending margin that a cleaner ground-up transition would give you for free. Fix the order of the transition and this swing gets both more consistent and longer without swinging any harder.
Swing video
What’s working
Setup is genuinely tour-standard: ~30 degrees of forward bend from the hips, driver-width stance, arms hanging free under the shoulders at frame 0 — nothing to change there.
The takeaway (frames 1-2) is one-piece — club, hands, arms and chest move away together with the lower body braced and no sway off the ball.
The finish at frames 10-14 is complete and held: weight fully on the lead leg, trail foot up on a vertical toe, chest to the target, and it stays still for several frames — that is balance earned by sequence, not luck.
Highest priorities
- 1
Stage the transition from the ground. At frame 6 the shoulders have already unwound while the hips are barely ahead of them — the chest is racing the pelvis. You want the belt buckle opening while the chest is still closed, so the arms get pulled down instead of thrown.
- 2
Firm up the top. At frame 5 the lead arm has softened and the hands have settled low and behind the trail shoulder, which shortens your width and forces the arms to re-find the slot on the way down. Hold the lead arm's structure and get the hands higher.
- 3
Get the trail heel releasing earlier. At frame 7 the trail foot is still heavy on the ground through the strike, which caps how far the hips can clear and leaves the arms doing more of the delivery than they should.
Four positions that shape the swing.
Annotations point only to features visible in the selected frames.
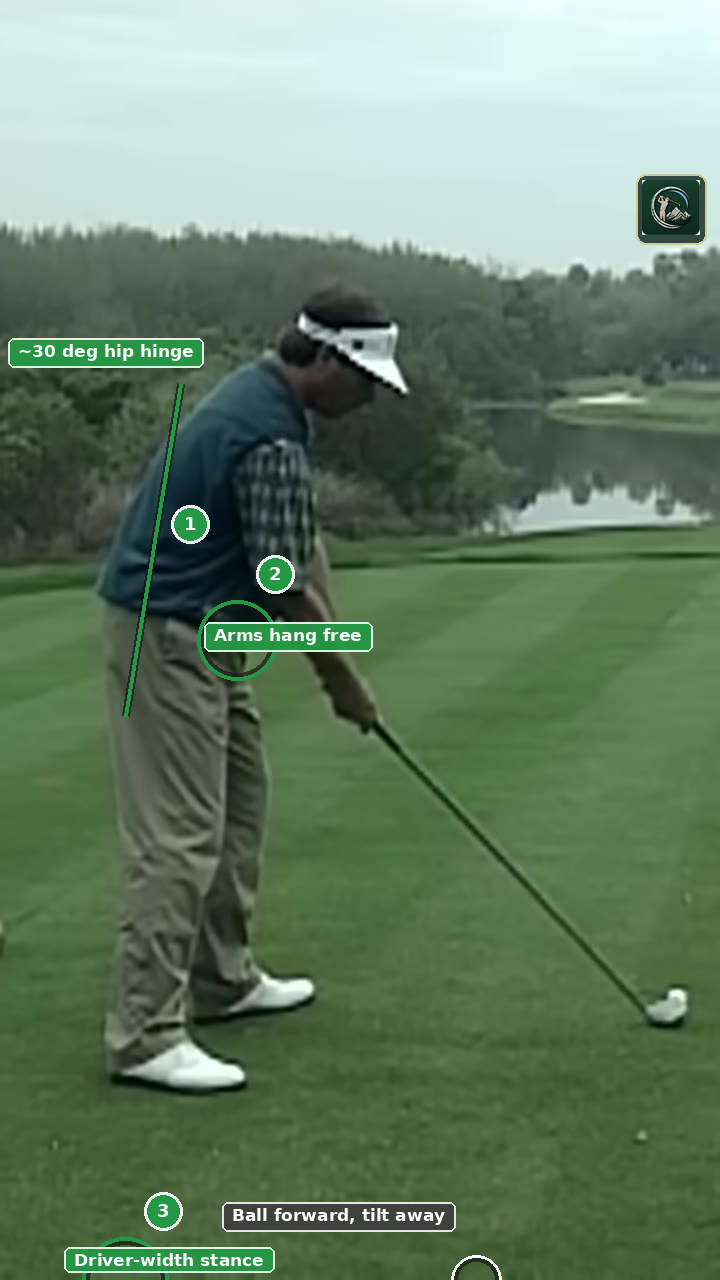 01
Address / setup
- 1~30 deg hip hinge
The forward bend comes cleanly from the hip joints with the chest over the toes and the back long — this is tour-standard driver posture and is the reason you hold your spine angle all the way to impact. Keep it exactly as it is.
- 2arms hang free
The hands hang under the shoulders with the handle low and comfortable space to the thighs — no reaching, no propping the handle up. This is what lets the takeaway stay one-piece.
- 3driver-width stance
Insteps are at least shoulder width with athletic knee flex and pressure through the middle of the foot — correct width for the driver and a stable base to turn against.
- ball forward, tilt away
Ball sits forward off the lead heel with visible spine tilt away from the target — exactly the launch condition a driver wants. Nothing to change.
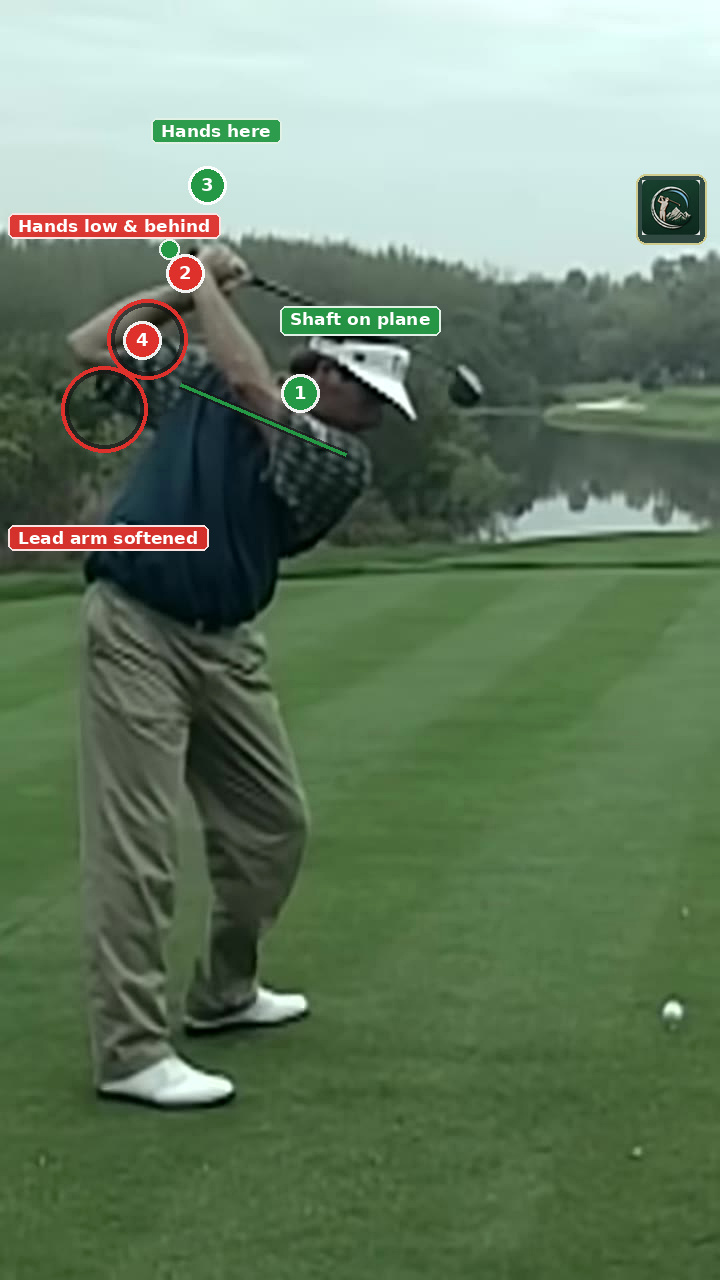 02
Top of backswing
- 1shaft on plane
The shaft at the top sits on a rounded plane roughly halfway between vertical and flat — real evidence you are turning the club around your body rather than lifting it with the hands. This is the best feature of your backswing.
- 2hands low & behind
The hands have settled below and behind the trail shoulder instead of finishing high with width. That costs you arc and forces a re-shuffle on the way down to find the slot.
- 3target: hands here
Aim to finish the hands roughly level with or just above the trail shoulder, with the lead arm still firm — that is the width you are currently giving away.
- 4lead arm softened
The lead arm has lost a little structure and the wrists have over-hinged, so the club sags at the top. Hold the lead arm long and let the turn, not the arms, set the length of the swing.
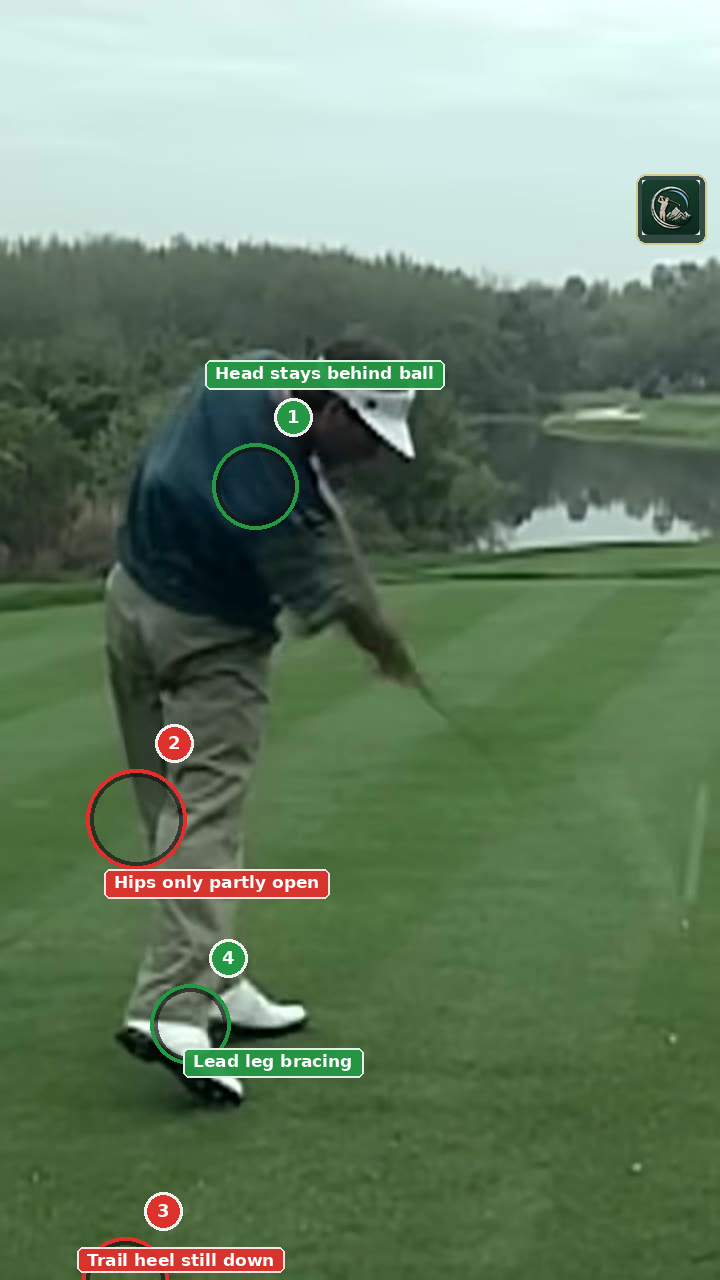 03
Impact
- 1head stays behind ball
At the strike the head is still clearly behind the ball with the spine angle from address fully retained — no stand-up, no slide. This is why you can hit it hard without losing the low point.
- 2hips only partly open
The pelvis is open but not as far as it should be for how far the chest has already turned, so the arms are asked to deliver more of the strike than necessary. Start the downswing with the belt buckle and this opens further with no extra effort.
- 3trail heel still down
The trail foot is still heavy on the ground as the ball leaves, which physically caps how far the hips can clear. Let rotation pull that heel up — it should already be off the turf at the strike.
- 4lead leg bracing
The lead leg is posting up and taking the weight through the strike — a genuine strength and the platform the whole finish is built on.
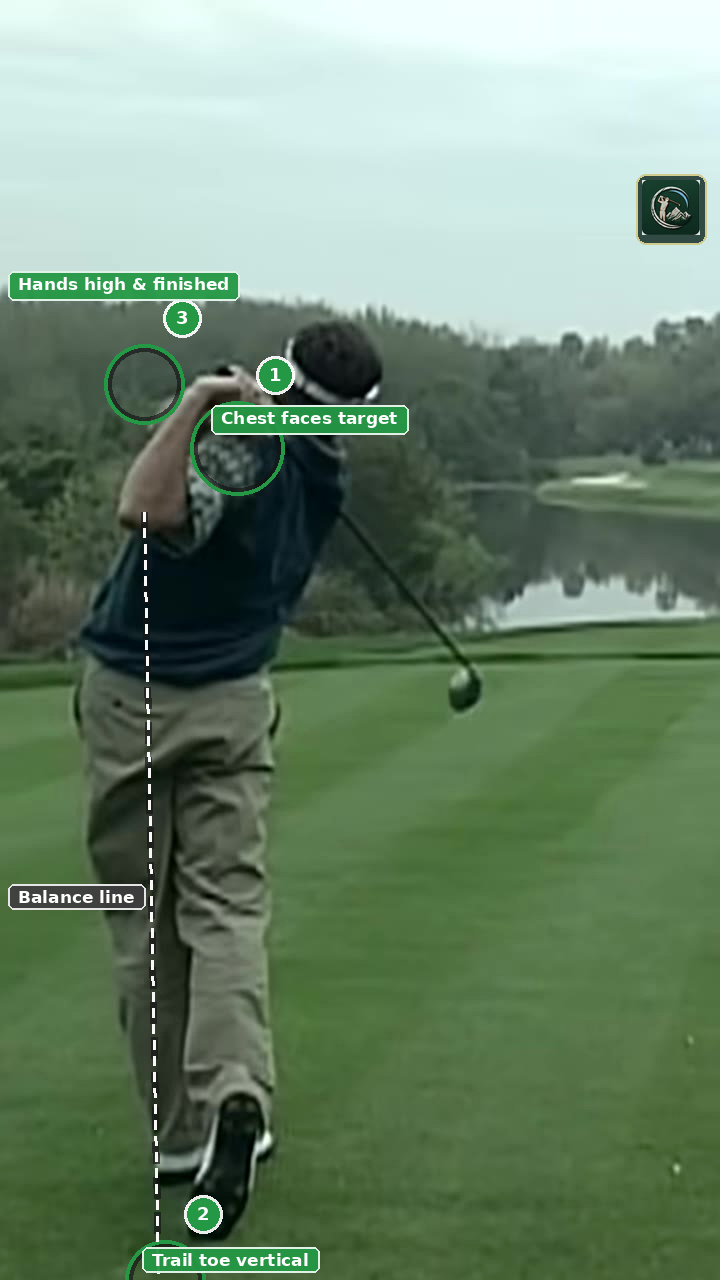 04
Finish
- 1chest faces target
Rotation is complete with the chest and belt buckle turned through to the target and the hips fully cleared — this is what a finished swing looks like.
- 2trail toe vertical
The trail foot has released onto a vertical toe with all the weight on the lead leg — the position is held still across several frames, which means the balance was earned by sequence rather than saved at the end.
- 3hands high & finished
The hands finish high behind the head with the club fully released — evidence there was no stall or flip through the ball.
The complete read.
Each checkpoint is scored from one to five based on visible swing positions.
Setup
12 / 15Frame 0 is a picture of how to stand to a driver: roughly 30 degrees of forward bend hinged from the hip joints with the chest over the toes, insteps at shoulder width, athletic knee flex with pressure through the middle of the foot, and the arms hanging freely under the shoulders so the handle sits low. There is nothing here a coach would touch.
Feet, knees and hips set one clean line down the target line at frame 0, the ball sits forward with visible tilt away from the target for the driver, and the address is completely still across frames 0-1 with no fidget. The shoulders read very slightly open to the foot line from this angle — minor, but it is the one line that does not quite match the rest.
From directly down the line the hands and handle are too small and shadowed to judge grip strength or face alignment, so that goes unscored. What is visible is good: the forearms are soft and connected in front of the chest, the hands hang about under the chin with sensible space from the thighs, and nothing looks gripped tight — though there is a small amount of extra tension in the trail arm at frame 1 compared with frame 0.
Backswing
10 / 15Frames 1-2 show a genuine one-piece move: club, hands, arms and chest go back together with no hands-first pickup, and the lower body stays braced with zero sway off the ball. The clubhead works slightly inside the hands sooner than ideal rather than staying outside them, and the wrists set a little late — the hinge arrives in a lump between frames 2 and 3 instead of building progressively.
The head and spine stay dead centered through frames 3-5 — no slide, no dip, no rise — which is the best part of this backswing. The shoulder turn gets to a useful but not full coil, and the trail hip gains only moderate depth, so the chest ends up doing a bit less work than it should. The arms stay reasonably in sync with the turn but start to outrun it late, which is what produces the slightly disconnected top.
The shaft at frame 5 sits on a nicely rounded plane, roughly halfway between vertical and flat — that is the tour-quality part and it proves you are turning, not lifting. But the hands have settled low and behind the trail shoulder rather than finishing high with width, and the lead arm has visibly softened and the wrists have over-hinged, so the club sags at the top. That loss of structure is why the downswing needs a re-shuffle before delivery.
Downswing
8 / 10Posture and head height are held beautifully through the change of direction — compare frame 5 with frame 6 and the spine angle is unchanged, no stand-up, no dive. The problem is the order: by frame 6 the shoulders have already unwound a long way while the hips have barely opened, so the upper body is leading the change of direction instead of the ground. Pressure does move into the lead foot, but it happens with the arms rather than clearly before them, and the shaft holds its plane rather than
Rotation never stalls — frames 7 through 9 show the body continuing to turn through the ball with no flip to rescue it, and the tight two-frame gap from top to strike shows real acceleration. But the pelvis does not clearly lead: the chest is opening almost in step with the hips at frame 6-7, so you lose the stretch that free speed comes from. The trail heel is also still planted heavily at the strike in frame 7 instead of being pulled up by rotation, which caps how far the hips can clear.
Impact & Finish
9 / 10The head stays clearly behind the ball with the spine tilt fully retained at frame 7 — no stand-up, no slide — and the weight is stacked on a bracing lead leg. The hips are open at the strike but less than they should be given how far the chest has come around, a direct consequence of the trail foot still being anchored. The hands and clubhead are blurred and screened by the body at the strike, so shaft lean cannot be judged from this angle.
This is the best-graded part of the swing. By frame 11 the chest and belt buckle face the target with the hips fully cleared, the weight is entirely on the lead leg, and the trail foot is released onto a vertical toe. The position is then held perfectly still across frames 11-14 — that is balance produced by sequence. The motion overall looks slightly effortful through transition relative to how smooth the finish is, which is the one thing keeping this from top marks throughout.
Three drills.
One direction.
Build the motion slowly, then add speed only when it stays organized.
Teach the pelvis to start the downswing before the chest, fixing the frame-6 problem where the shoulders unwind first.
Pump-and-Stop Transition
- Swing to your top position and stop, holding it for a count of one.
- From there, bump and rotate the lead hip toward the target while consciously keeping your chest pointed away from the target — feel the stretch across your midsection.
- Pump down to about waist height twice keeping that separation, then on the third pump swing through to a full finish.
- Do ten reps at half speed, then hit five balls at three-quarter speed trying to keep the same order.
Restore structure and height at the top so the hands stop sagging low and behind the trail shoulder as they do at frame 5.
Lead-Arm Width Check
- Take your driver setup and make slow backswings, stopping when your hands reach the top.
- Have a mirror or camera down the line: check the lead arm is still firm and the hands sit level with or above the trail shoulder, not below it.
- Hold each top position for three seconds to build the feel of supporting the club rather than letting it collapse.
- Add ten slow-motion full swings keeping that same top, then hit five balls at 70 percent.
Free the trail foot so rotation can pull it up through the strike instead of it staying planted as at frame 7.
Trail-Heel Release Step
- Set up normally, then before you swing lift the trail heel about an inch and set it back down softly — that is the amount of freedom you want.
- Make half swings where you deliberately let the trail heel come off the ground as the hips open, feeling the pressure roll to the inside of the trail toe.
- Progress to full swings, checking on video that the trail heel is clearly off the ground by the moment the club reaches the ball.
- Finish every rep on a vertical trail toe and hold it for three seconds.