
Shea
This is a fast, committed driver swing from a young, athletic player with a genuinely good through-swing: the club exits high and left, the trail foot releases up onto the toe, and the finish at frames 22-23 is held tall and still. The problems live at the two ends of the motion. At the closest-to-address frames the posture is a little slumped through the middle with the chest not far enough over the toes, and the shaft at the top (frame 0) is short of a full, deep load — the hands are shallow and behind the body more than high, with the club still working up rather than around. Through the strike zone the head and chest climb: compare the head height at frame 7 to frame 12 and you can see the spine angle lift as the body rotates open early, which is why the hands have to work out and up to find the ball. The tempo reads well — a full, unhurried backswing and a compressed, accelerating downswing with real blur at the bottom — so the raw speed and the balance are already there. Build the swing around a steadier pivot height and a deeper, more coiled top and this becomes a legitimately good driver motion.
Swing video
What’s working
The finish is genuinely tour-flavoured: at frames 22-23 the weight is entirely on the lead leg, the trail foot is released onto a vertical toe, and the position is held still for a beat rather than saved after a stumble.
The trail heel releases naturally with the rotation through frames 12-16 — the lower body keeps turning through the strike instead of stalling and letting the hands flip the club at the ball.
Tempo and commitment: a full backswing followed by a compressed, blurred downswing shows the club accelerating into the ball rather than being guided or steered.
Highest priorities
- 1
Stop the stand-up through impact. The head is visibly higher at frame 12 than at frame 7 and the pelvis pushes toward the ball line, which forces the hands to lift and rescue the strike. Hold your address hip height and your chest angle until the ball is gone.
- 2
Deepen and complete the top. At frame 0 the club is short of a full load with the hands more behind the chest than high over the trail shoulder — the arms have run out of room before the chest finished coiling. Turn the trail hip behind you and let the shoulders reach closer to 90 degrees so the downswing can start from the ground.
- 3
Fix the address posture that causes both of the above. In frames 6-7 the bend comes partly from the waist rather than clean hip hinge, with the chest a touch behind the toes — a slumped setup gives the body nowhere to go but up in the downswing.
Four positions that shape the swing.
Annotations point only to features visible in the selected frames.
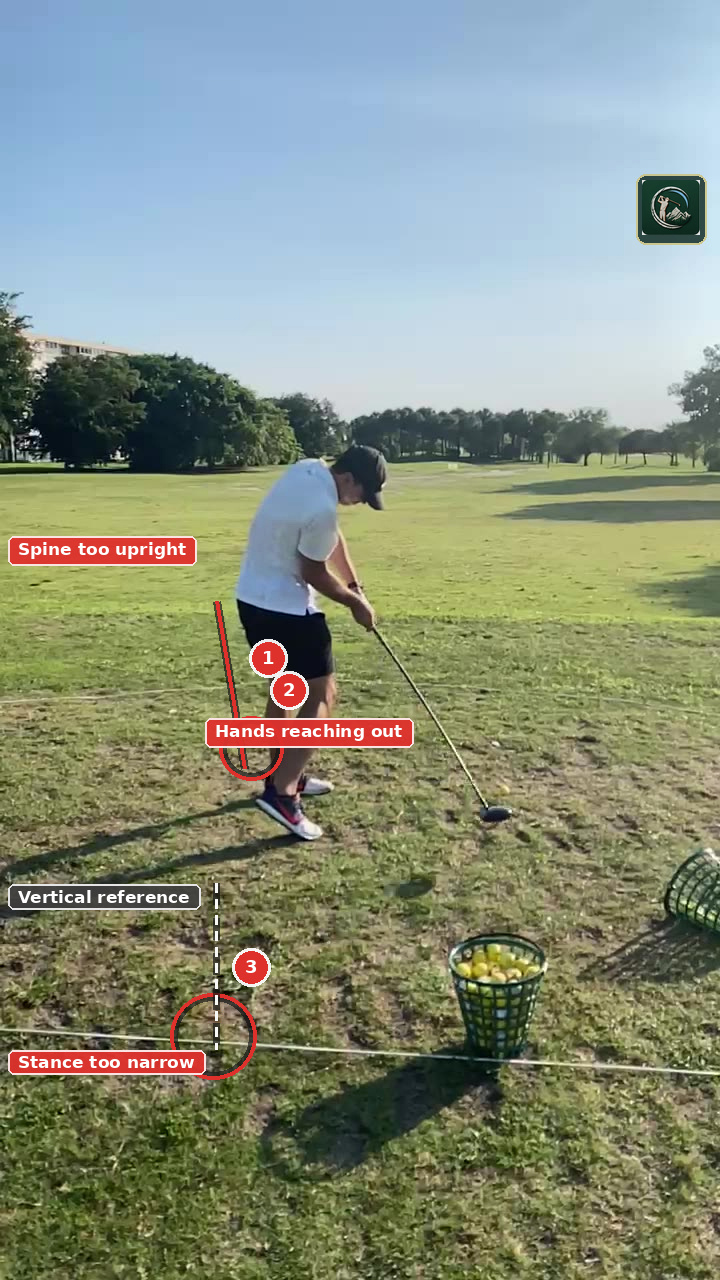 01
Address / setup
- 1spine too upright
Traced along your back at frame 9, the forward bend is closer to 20 degrees than the 25-40 a driver setup wants, and much of it is upper-back rounding rather than a hip fold. Push the hips back and get the chest out over the toes so the arms have room to swing.
- 2hands reaching out
The handle sits high and away from the body instead of hanging under the chin — a symptom of the tall posture, not a separate grip fault. Add hip bend and the hands drop into place on their own.
- 3stance too narrow
For a driver the insteps should reach at least shoulder width; here the base is noticeably tighter than that, which leaves nothing to coil against. Widen the trail foot a couple of inches.
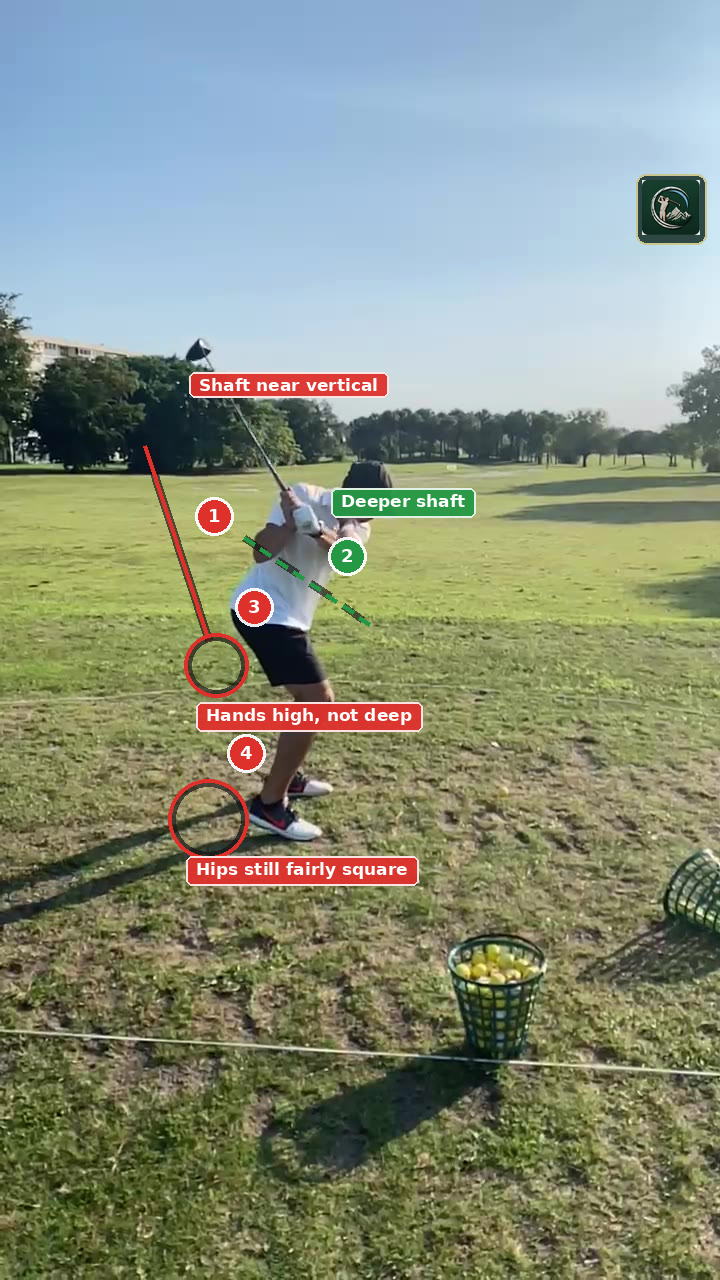 02
Top of backswing
- 1shaft near vertical
The clubhead sits almost directly above the hands instead of on a rounded plane roughly halfway between vertical and flat — this is an arm lift, not a coil, and it is the root cause of the steep first move down. Trade hand height for hand depth behind the trail shoulder.
- 2target: deeper shaft
This is roughly where the shaft should lie at the top — flatter and further behind you, with the hands set back over the trail shoulder rather than stacked above it. From here the club can fall into the slot instead of being re-routed.
- 3hands high, not deep
The hands finish high but narrow, sitting over the trail shoulder rather than behind the chest, so there is height without leverage. Feel the hands travel back and around rather than up.
- 4hips still fairly square
The trail hip has not gained real depth behind you, so the chest is coiling against very little and the arms have to make up the length. Turn the trail pocket behind you to build a top you can actually use.
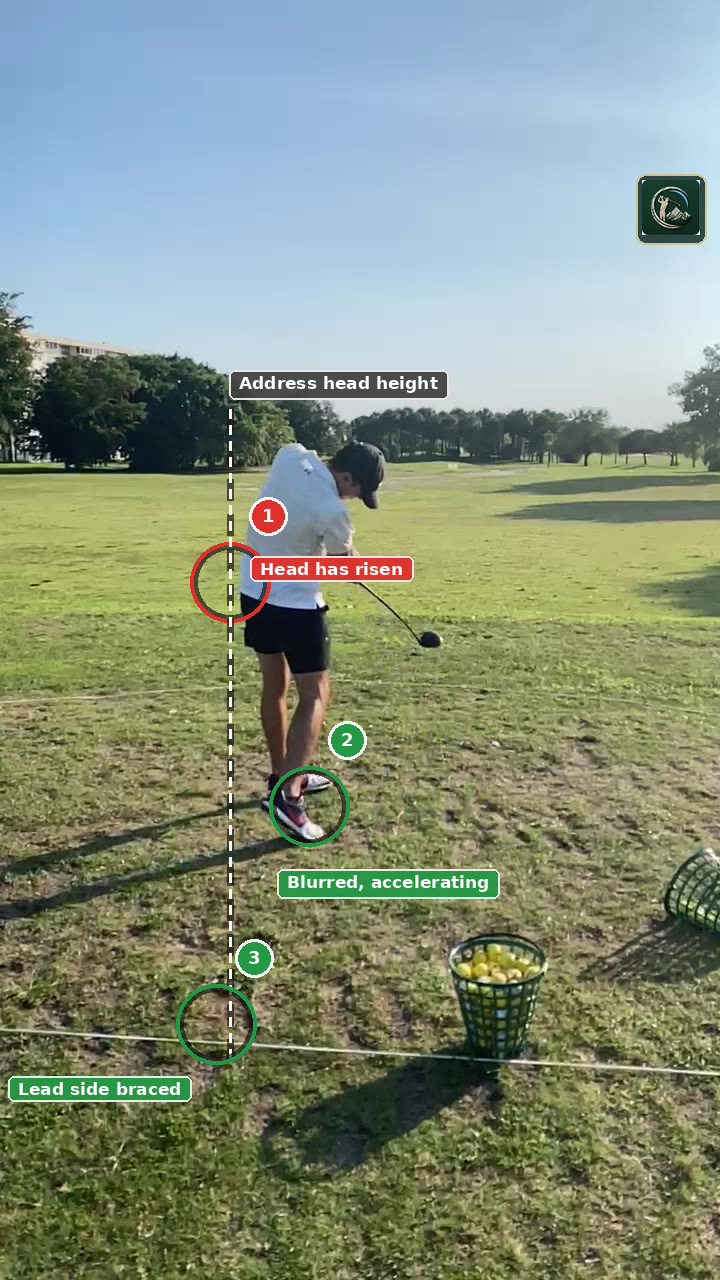 03
Impact
- 1head has risen
Compare the head height here to frame 7 — it has climbed and the spine tilt is gone. That stand-up makes the arms lift and rescue the strike; hold your address height until the ball is away.
- 2blurred, accelerating
The clubhead blur at the bottom shows real speed being delivered through the ball rather than a guided pass — worth keeping as you clean up the pivot.
- 3lead side braced
Weight is stacked into the lead foot with the leg bracing, which is exactly what you want at the strike. The pressure shift is not the problem — the height change is.
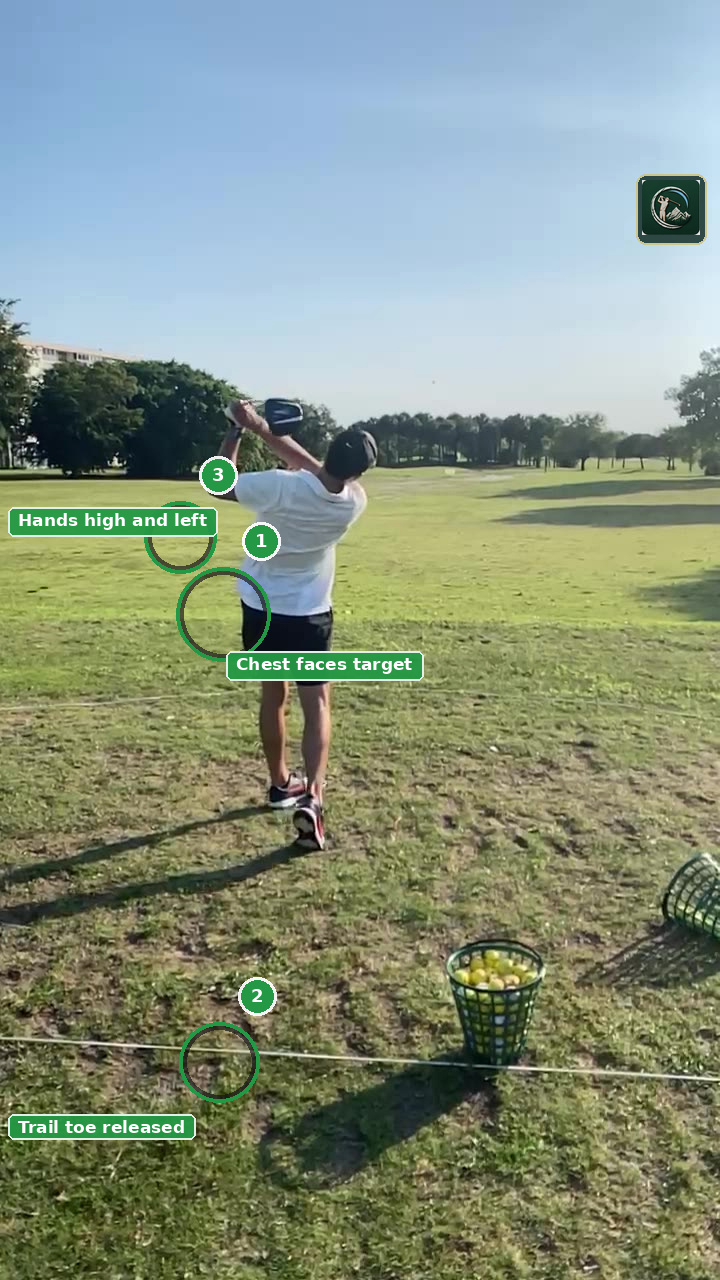 04
Finish
- 1chest faces target
Full rotation with the chest and belt buckle through to the target and the hips completely cleared — a tour-quality finish shape.
- 2trail toe released
The trail foot has released onto a vertical toe with all the weight on the lead leg, and the position is held still for a beat rather than saved. Keep this.
- 3hands high and left
The club has exited high and around the body, which confirms rotation kept flowing through the strike instead of stalling. This is the payoff of the trail heel releasing on time.
The complete read.
Each checkpoint is scored from one to five based on visible swing positions.
Setup
9 / 15In frame 7 the forward bend is closer to 20 degrees and a chunk of it comes from rounding the mid-back rather than a clean hip hinge — the chest sits back over the heels instead of over the toe line. Stance width is acceptable for a driver but not quite generous, and the knees carry usable flex. Set up by pushing the hips back until you feel the hamstrings, then let the arms drop; the handle will find its own height.
Feet and knees look coherent to the target line from behind and the ball sits forward enough for a driver, but the shoulder line cannot be judged from this camera. The bigger issue is the lack of a still, organized moment before the takeaway — the sampled frames show the body already trickling into motion with no settled pause. Build a two-second freeze after the last look at the target so the swing starts from a defined position.
The hands are too small in frame to read grip strength or face angle, so that checkpoint is off the card. What is visible is acceptable: the elbows stay soft in front of the chest at frame 7 and the hands hang with reasonable clearance from the thighs, with no visible squeezing or regripping. Nothing here is holding the swing back.
Backswing
7 / 15The clip begins after the club is already moving, so the one-piece move away and the early clubhead position relative to the hands simply are not on film. What can be read from the surrounding frames is that the lower body stays braced without a sway off the ball, and the wrists appear to set gradually rather than snapping up. Film a swing from the very first move so this section can actually be graded.
At frame 0 the chest has coiled maybe 70 degrees, not the 85-90 a driver wants, and the trail hip has not gained real depth behind you — the arms have carried more of the backswing than the pivot has. That shortfall is exactly why the downswing has to be aggressive to make up the distance. Head and spine stay reasonably centered, which is the part worth keeping; feel the trail glute move behind your heel as the chest turns.
In frame 0 the shaft sits on a workable rounded plane, but the hands finish shallow and low around (300,520) rather than high over the trail shoulder, so there is little width or depth behind the chest. The lead arm holds its structure, yet the position does not look fully loaded — it is a top the club has arrived at rather than one the body has built, which is why the transition relies on effort. Get the hands taller and deeper and the change of direction will feel unhurried.
Downswing
7 / 10Pressure does move to the lead foot and the lower body starts the change of direction rather than the shoulders spinning from the top, and the shaft holds its plane without an obvious over-the-top steepening. What breaks down is posture: between frames 7 and 10 the hips already start pushing toward the ball and the head begins to rise, so the swing loses its floor before the club has arrived. Keep the belt buckle down and the chest angle constant as the lower body starts down.
The trail heel releasing on time through frames 12-14 is genuinely good — nothing is planted flat after the ball is gone — and the rotation keeps flowing through the strike with no stall-and-flip. The pelvis leads, but only modestly ahead of the chest, and the wrist angles look partly spent before the delivery zone rather than held deep. More lag retention and a bigger gap between hip and chest rotation is the next gain here.
Impact & Finish
7 / 10At frame 11 the hips are open and the weight is stacked left with the lead leg bracing, which is the right shape. But the head has climbed noticeably from its address height and the spine tilt has been given up — that stand-up is the single biggest fault in the swing, because it forces the arms to lift and re-find the ball. Hands look level with the clubhead rather than clearly leading; both problems improve once the pivot stops rising.
This is the best part of the swing. By frame 22 the chest and belt buckle face the target with the hips fully cleared, the weight is entirely on the lead leg, and the trail foot is up on a vertical toe — held still, not rescued. The only reservation is that the overall motion still looks slightly effortful in the transition, as if the finish is earned by speed rather than by sequence; tidy the top and this finish will come from the pivot instead.
Three drills.
One direction.
Build the motion slowly, then add speed only when it stays organized.
Kill the stand-up through impact by teaching the pelvis to rotate while staying at address height.
Wall-Butt Pivot Hold
- Set up in your driver posture with your rear end just touching a wall or the back of a golf bag.
- Make slow backswings and downswings keeping contact with the wall the whole way to impact — if the wall contact is lost, you have pushed the hips toward the ball.
- Add a mirror in front and watch your head height: it must not rise between address and the strike.
- Build to half-speed swings hitting a ball off a tee with the same wall feel.
Add depth and shoulder turn at the top so the downswing starts from the ground, not from the arms.
Trail-Hip-Behind-You Coil
- Take your driver posture and place an alignment stick or club across your hips.
- Turn to the top slowly, feeling the trail hip move behind your trail heel while the trail knee keeps its flex.
- Pause at the top and check in a mirror that your hands are over or behind the trail shoulder, not low and shallow.
- Do ten slow reps, then hit three balls at 70% speed keeping the same top position.
Replace the slumped, unsettled setup with a hinged, still address that the rest of the swing can be built on.
Posture-Set Address Routine
- Stand tall with the club across your chest, then push the hips back until you feel the hamstrings load — about 30 degrees of forward bend from the hip joints.
- Let the arms hang straight down under the shoulders and take your grip from there without changing spine angle.
- Count a full two seconds of complete stillness before starting the club back.
- Repeat the whole routine before every range ball for one full session.